
How to Make a Hand-Tied Bouquet
A hand-tied bouquet is one of the simplest DIY bouquets and as the name suggests, it is loosely arranged by hand. Typically tied off with ribbons or twine leaving the bottom stems exposed giving it a "fresh-picked-flowers" look and feel.
It is easy to make even for someone doing it for the first time. You will only be needing minimal supplies – flowers, fillers and ribbons or twine to tie.
Here’s our easy, step by step process for crafting your own hand-tied bouquet.

FLORAL SUPPLIES AND TOOLS NEEDED
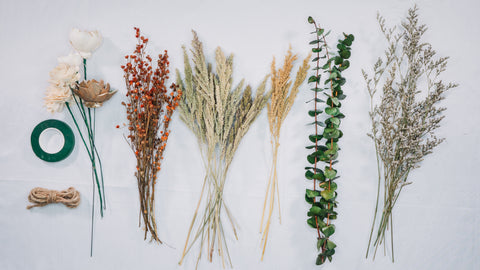
- Sola Wood Flowers
- Preserved Eucalyptus
- Assorted Dried and Preserved Fillers
- Glue Gun
- Floral Tape
- Jute Twine
[[supplies]]
STEP 1: PREPARE THE MATERIALS
Organize the blooms, fillers and other supplies. Cut all the stems to a manageable length. You can cut the stems further once the bouquet is tied. Lay out the prepared supplies on a clear surface so that they are easy to grab.

STEP 2: MAKE THE ARRANGEMENT
And the fun begins! Start with your focal flower then slowly add greenery, like foxtail grass and asters to your arrangement. You can always find alternative fillers HERE. The foxtail grass can be replaced with Wheat Grass and the aster flowers with Broom Blooms,

Work from the inside of the bouquet to the outside. Rotate the arrangement as you add more flowers and fillers.

As each stem is added, slightly drop the height to get a layered shape. Secure the bunch with floral tape.

Imagine yourself walking in the garden, picking the flowers and arranging them loosely.

Be generous with the fillers. Insert in between the flowers and around them.

Secure the stem with floral tape

Finish with fillers that have sturdier stems. This will help prevent the softer stems from drooping. For our arrangement, we are using preserved spiral eucalyptus.
STEP 3: SECURE THE ARRANGEMENT

Fasten it further with burlap twine. Apply glue at the top of the tape. Press one end of the twine and hold in place until it is glued on properly.

Get the twine then loop it round the bunch above your holding hand. Twist and turn until about 3 inches down. Cut and glue the other end of the twine.

STEP 4: TRIM THE STEMS
Cut all the stems at the same length so that the bouquet looks neatly arranged.

If you are placing the bouquet in a jar or a vase, trim the stems gradually and test as you go. The bunch should fit snugly inside the vase.
STEP 5: DISPLAY THE ARRANGEMENT


Carry your creation proudly down the aisle or decorate your home with it
[[supplies]]